
Cleaning your fire rescue grill brush is more than a matter of routine maintenance; it is essential for ensuring safety and effectiveness during every use. Firefighters and emergency rescue personnel rely on their equipment to perform optimally, which includes keeping tools like grill brushes in top condition. Additionally, community residents and educators can benefit from understanding the proper care of these tools as it reflects a commitment to safety and preparedness within their environments. This guide will explore best practices in three chapters, detailing how to remove loose debris, effective soaking and scrubbing techniques, and the importance of proper drying and storage methods. Engaging in these practices not only prolongs the lifespan of your grill brush but also enhances its performance, ensuring cleanliness and safety during operations.
Restoring Readiness: Thorough Cleaning and Care for the Fire Rescue Grill Brush and Its Replacement Cleaning Head
In the rhythm of a fire rescue team, every tool earns its keep through reliability, and a grill brush stands as a quiet sentinel between meals and safety. The same discipline that guides equipment maintenance on the front lines should guide the way a cleaning head performs its work. A clean grill brush is more than a spotless surface; it is a barrier against cross-contamination, a factor in maintaining heat control, and a sign that readiness is taken seriously. This chapter threads together practical steps with the mindset of ongoing care, weaving a narrative of how to restore and preserve the functionality of the fire rescue grill brush, including the replacement cleaning head, so that it remains as dependable as the crews who rely on it. The goal is not just removal of grime but the assurance that the next clean surface you reach for will respond with consistent performance when it matters most.
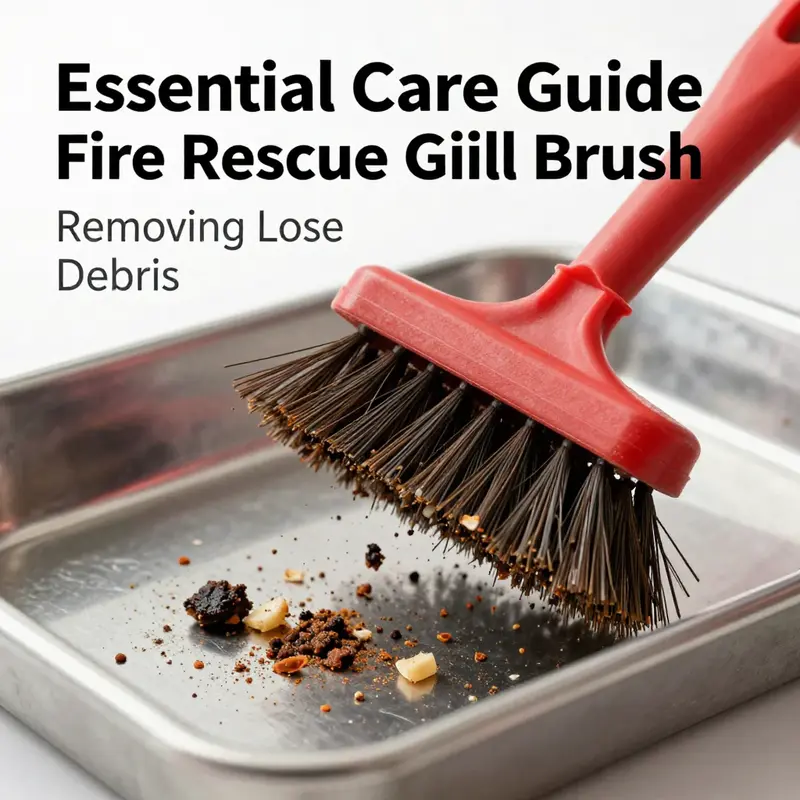
Begin with a tempered approach to post-use discipline. Immediately after the task ends, set aside any hasty, adrenaline-driven impressions of the job and start with a cooldown. Heat and residue often cling stubbornly to metal and plastic alike, and rushing the cooling process invites steam burns, warped components, and moisture that promotes mold or corrosion. When the head has reached a safer temperature, a quick rinse under tap water helps dislodge the bulk of the loose debris—grit, char, and grease that have accumulated on bristles or along the crevices of the replacement cleaning head. This initial rinse serves two purposes. It prevents the grime from hardening as the brush head sits, and it gives you a visual cue about how much material remains trapped in the surface layers. In the case of a brushless design, the absence of bristles does not mean the head is free of debris. Particles cling to small channels, edges, and the tiny seams where the head meets its mounting interface. A careful, thorough rinse is still essential, and the habit of performing this step immediately after use becomes a cornerstone of long-term performance.
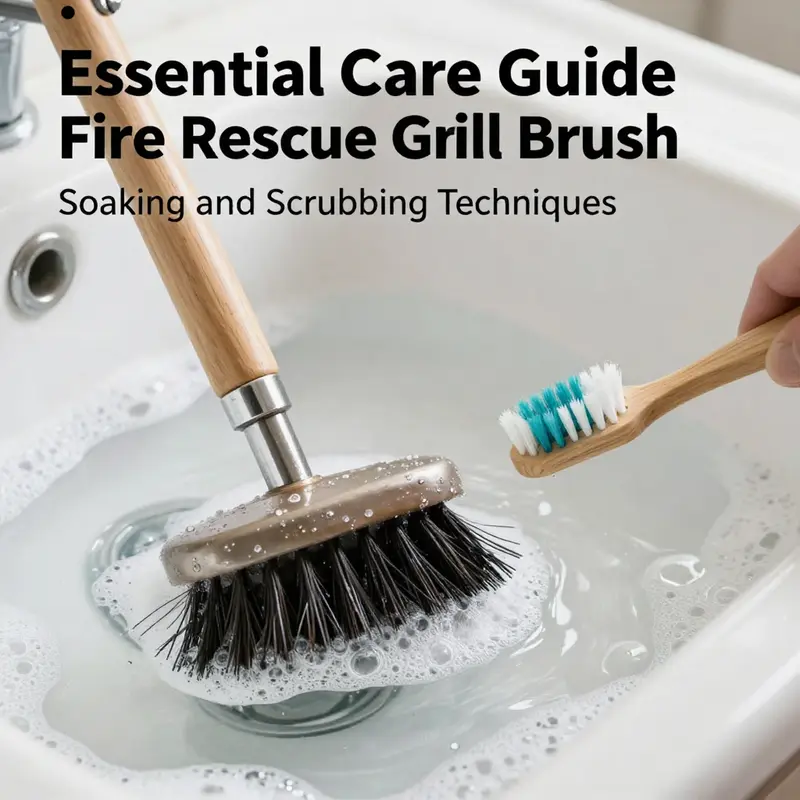
If the debris proves stubborn, a light soak is often all that is needed. Prepare a basin of warm water with a modest amount of dish soap. The warmth helps loosen oils and char without harming most materials used in rescue-grade gear. Submerge the entire cleaning head in the solution, taking care to protect any parts that may be sensitive to prolonged moisture. The caveat here belongs to the handle; many handles incorporate wood or certain plastics that do not withstand extended immersion. If the design of your cleaning head includes a handle that could be compromised, either partially immerse the head and protect the handle with a plastic bag or wrap, or simply wipe the handle with a damp cloth after rinsing the head itself. This approach aligns with a safety-first philosophy: you preserve the integrity of the handle while giving the cleaning surface access to the grime trapped in the smallest recesses.
For the replacement cleaning head itself, the absence of bristles shifts the cleaning dynamics but does not diminish the need for attention. After the soak, a deliberate rinse helps flush out the loosened residue. Because there are no bristles to scour, you’ll often rely on a soft-bristled brush or a clean, old toothbrush to reach into the channels and along the edges where material tends to accumulate. The goal is not aggressive scrubbing but a controlled, methodical contact that dislodges material without scratching or gouging the surface. In some cases, a gentle dab with a microfiber cloth followed by a rinse can remove fine particulates that cling to the surface. If stubborn residues persist, a very light application of baking soda as a gentle abrasive can be employed, but with restraint. A paste applied sparingly to problem areas, a brief contact, and then thorough rinsing typically does the trick without risking damage to the head’s exterior or any protective coatings.
A critical point to bear in mind with brushless or brush-surface designs is that the cleaning action relies on surface contact and the removal of residues from small channels rather than sweeping bristles across a surface. This means your technique should emphasize removal of grease from seams and the corners rather than brute scrubbing. After the soak and the targeted wipe, perform a thorough second rinse. Run clean water across every facet of the head, ensuring all soap and loosened debris are carried away. In many cases, small particles hide in grooves or assemble around the mounting interface. A careful, repeated rinse helps ensure these pockets are cleared. It can be tempting to rush this stage, but the longevity of the cleaning head depends on complete removal of soap and residue, which otherwise attracts more dirt and invites odors or corrosion over time.
As you move from washing to drying, the emphasis should shift toward complete dryness. A damp environment is a fertile ground for rust, mold, or bacterial growth, especially in metal or composite components. Shake off as much water as possible and then air dry in a well-ventilated area. If space allows, place the head on a clean towel or rack with good airflow to expedite the process. Do not leave the head resting on a damp surface, and avoid stacking with other damp equipment, which can trap moisture and invite microbial growth. Drying is not merely a housekeeping step; it is a preservation practice that reduces wear and helps you trust the tool when you next reach for it in a high-stress moment.
Sanitization, while optional for routine maintenance, is a practical consideration for hygiene and odor control. A common approach is to use a vinegar solution, one part white vinegar to three parts water, for a 10- to 15-minute soak. The acidity of vinegar can help kill bacteria and neutralize odors without introducing harsh chemical residues. After this brief sanitizing soak, rinse once more with clean water to remove any vinegar remnants. While this step can enhance hygiene, it is not a substitute for thorough drying and proper storage. The purpose of sanitizing is to complement, not replace, the mechanical cleaning you’ve already performed. In facilities where procedures require strict hygiene protocols, sanitizing is a straightforward addition that fits neatly into the same cadence of post-use care you already practice.
Storage is the quiet but essential companion to cleaning. Store the cleaning head in a dry, well-ventilated area. Avoid keeping it in closed spaces such as toolboxes or drawers that accumulate moisture. A small, dedicated rack or hook that allows air to circulate around the head is ideal. If your setup includes a reusable cleaning kit, place the head in a breathable bag or container that protects it from dust while allowing moisture to escape. The storage environment should reflect the same mindfulness you apply to cleaning: a space that discourages rust, mold, and odor build-up keeps the tool ready for action rather than waiting in a damp corner until it becomes a problem.
Though the steps above describe a routine that can be adapted to both traditional bristle brushes and the specific brushless design of a replacement cleaning head, the underlying principle remains constant: treat the tool as a critical component of safety and performance. When you clean after every use, you do more than remove grime. You preserve the integrity of the cleaning surface, you maintain the tool’s effectiveness for future tasks, and you reinforce a culture of care within the team. This philosophy extends beyond vanity cleanliness; it is about reliability, speed, and trust when every second counts. As you move through the cycle of cooling, rinsing, soaking, scrubbing, drying, sanitizing, and storing, you cultivate a routine that protects both equipment and people.
The chapter of care that begins with removing loose debris is not only about maintenance; it is also an invitation to consider what the head endures during firefighting operations. When a cleaning head is neglected, the smallest hidden pockets of residue can become stubborn, leading to slower action, inconsistent results, or recaptured odors that hint at underlying buildup. A disciplined approach—quickly rinsing after use, attending to stubborn residues with a targeted soak, avoiding abrasives that could scratch sensitive surfaces, and ensuring complete drying—preserves your tool’s surface integrity and its ability to perform when heat and pressure demand precision. The steps are simple, but their cumulative effect is profound. They extend the life of the head, reduce the risk of contamination, and help ensure that the crew’s final task of cleaning the grill does not compromise the safety of the next operation.
For a broader frame of reference, consider the safety and maintenance guidance published by firefighting authorities and equipment manufacturers. These sources emphasize regular cleaning as part of equipment readiness and highlight practical precautions that align with the routine described here. In particular, do not immerse the entire handle in water if it is made of wood or a plastic that may degrade over time; instead, protect the handle during soaking or wipe it down with a damp cloth as an alternative. This limitation underscores a simple truth: the integrity of the entire tool rests not merely on the head, but on the thoughtful handling of all its components. The careful separation of head and handle during cleaning, when appropriate, reduces risk and prolongs the life of the tool. If you are ever unsure about the materials involved, consult the equipment guide or manufacturer recommendations, which typically provide explicit cautions and best practices for your specific design.
Throughout this process, the continuity between previous and subsequent maintenance steps remains intact. Cleaning the head in a disciplined, methodical fashion complements other routines, such as inspecting mounting points for looseness, checking for cracks or corrosion in metal surfaces, and ensuring that any protective coatings remain intact. The practice of cleaning after each use is not a one-off ritual; it is a continuous thread that runs through the team’s daily operations and into the quiet hours of post-shift hygiene. When you approach maintenance with purpose, you raise the baseline—making every future cleaning faster, easier, and more reliable. The end result is a tool that feels less like a disposable implement and more like a trusted partner in scene-safe firefighting and post-incident recovery. The brush head, despite its brushless design, becomes a model of thoughtful care: a surface free of grease, a length of time before odor returns, and a confidence that your equipment will meet the challenge when it’s needed most.
A final reflection ties the practical steps to the overarching aim of safety culture. Cleaning is not a chore; it is a critical step in safeguarding responders and the communities they serve. When you consistently remove loose debris, soak when necessary, scrub gently, rinse thoroughly, dry completely, and store properly, you are defending against corrosion, bacterial growth, and performance degradation. You are also modeling to others the importance of maintenance discipline—an example that reinforces the chain of preparedness that begins with a simple act of care. This chapter is not about clever shortcuts; it is about proven routines that withstand the pressures of real-world use. By honoring these practices, you ensure that the replacement cleaning head remains a reliable, ready tool for the next call, the next shift, and the next test of readiness that defines every firefighter’s mission. The chain from debris removal to ready-for-action is short, direct, and tirelessly dependable when followed with care.
External reference: https://www.nfpa.org/About-The-NFPA/Newsroom/Press-Releases/2025/NFPA-Reminds-Fire-Rescue-Workers-to-Properly-Clean-Their-Equipment
From Heat to Hygiene: Mastering Soaking, Scrubbing, and Safe Care for Fire-Rescue Grill Brush Gear
Cleaning a fire-rescue grill brush is more than a routine chore; it is a critical safety practice that preserves performance and reduces risk. The brush is a frontline tool in grilling applications that often involve high heat, thick grease, and stubborn residues. When neglected, the bristles can harbor bacteria, rust can corrode metal, and blocked pores can render the brush less effective. The goal of a thorough maintenance routine is not merely to remove visible grime but to restore the brush to a state that supports efficient cleaning without introducing new hazards. In the wider context of fire-rescue equipment upkeep, routine maintenance is a discipline that protects responders and the communities they serve. The chain of care begins with a mindful habit: after each use, take a moment to assess what the brush has encountered, and plan the next steps with attention to safety, material integrity, and long-term reliability.
A practical, integrated approach to cleaning begins with addressing loose debris. Immediately after a session on the grill, even before the heat subsides, some surface particles remain lodged in the bristles. Those particles may be bits of charcoal, charred fat, or small drippings. Rather than letting them cool and harden, a quick, tactile pass can loosen them. A firm scrape against a hard surface, such as a metal tray or the edge of the grate, dislodges larger chunks. This initial step is simple but essential; it prevents the debris from fusing into the bristles during the next phase and reduces the number of times you must scrub with force later. The goal is to minimize resistance, not to force the brush into aggressive agitation. After this initial removal, you can move to the soaking stage, which softens remaining grease and evaporates some of the stubborn residues that cling to the bristles and the base where bristles meet the handle.
Soaking in hot, soapy water is the next logical act in the ritual of renewal. Fill a sink or tub with hot water and add a small amount of dish soap. The water should be hot enough to encourage bubbles and to dissolve fats but not so hot that it risks scalding the hands. Submerge the entire brush, including the handle, and let it rest for 15 to 30 minutes. Submersion is particularly effective for bristle-based brushes, where fat and grease can hide in the tiny crevices at the base of each filament. The soaking step loosens the stubborn grime and accelerates the subsequent scrubbing. If your brush features any wooden components or plastics that may be sensitive to moisture, keep those parts out of the water when possible or protect them with a light barrier, such as a plastic bag or wrap, to preserve their integrity. The emphasis here is on patience and thoroughness: a brief soak may be convenient, but a longer, deliberate soak yields a cleaner brush with less manual effort.
When it is time to scrub, choose a stiff-bristled brush or an old toothbrush to reach into the nooks between bristles and toward the juncture where bristles meet the handle. Scrub firmly enough to dislodge residue but not so aggressively that you bend or detach filaments. Focus on the base where grease and debris accumulate—the area that is most likely to harbor grime despite prior brushing. A gentle abrasive like baking soda can assist in tougher buildup. Sprinkle a small amount onto the bristles and scrub in small circular motions; the mild abrasive helps cut through stubborn grease without damaging the metal or plastic components. The combination of soaking and scrubbing is a two-part strategy: soak to release, scrub to lift away. Together they render the brush ready for a thorough rinse.
Rinsing and drying complete the physical cleaning, but attention to drying is equally important. Rinse the brush under running water until all soap and residue are removed. Shake off excess water and place the brush in a dry area to air out. Laying the brush flat or hanging it upside down encourages complete drying and prevents water from pooling at the base, which can promote rust on metal parts or mold growth in damp environments. For brushes with metal components, drying is especially critical because moisture left to linger can hasten corrosion, weakening the tool over time. Do not store a damp brush in a closed, dark space where stagnation can invite odors or microbial growth. A well-ventilated, dry rack or hook is ideal.
Some practitioners opt for an additional hygiene step that enhances odor control and reduces microbial presence. A soak in a vinegar solution—one part white vinegar to three parts water—for 10 to 15 minutes can sanitize the bristles and neutralize odors. This is followed by a thorough rinse to remove any residual vinegar. While this step is optional, it can be beneficial when the brush has seen heavy grease or when it will be stored for an extended period. The vinegar solution is effective because vinegar disrupts microbial growth and helps dissolve mineral deposits that might cling to metal surfaces. After the vinegar bath, rinse again and dry completely as described. The goal remains clear: to minimize any residual moisture, odors, or contaminants that could transfer to food or degrade the brush’s performance over time.
Storage practices are the final piece of the routine, and they demand attention to environment as much as the cleaning itself. Store the brush in a dry, well-ventilated area, away from damp basements, toolboxes that trap moisture, or enclosed drawers where air cannot circulate. A dedicated hook or rack in a pantry, workshop, or equipment room keeps the brush accessible yet unfettered by humidity. Avoid enclosing the brush in sealed containers when it is still damp or even mildly moist, as that environment can encourage mold growth or corrosion. The broader aim is to preserve the brush’s shape, bristle integrity, and handle condition for the next assignment. In the long view, such care reduces the need for early replacement and supports the consistent performance demanded by fire-rescue operations.
The precise method of cleaning can vary depending on the type of grill brush head you use. In many rescue settings, cleaners operate with a specialized head designed to withstand heat and to work efficiently with high-temperature grills. Before deploying any technique, first consider the material composition of the brush head and its handle. If the handle is wood or a porous plastic, avoid prolonged soaking that could swell or degrade the material. A simple safeguard is to protect the handle with a plastic bag during soaking or to wipe it with a damp cloth rather than submerging it. This nuance matters because wood and some plastics do not tolerate repeated, extended exposure to water in the same way metal and certain polymers do. For those who employ a heat-assisted cleaning head, there is an additional, practical nuance: some devices are designed to be used on a hot grill to leveraging steam. The concept is straightforward: pre-soak the cleaning head, then apply it to grates that are hot enough to generate steam when the head comes into contact with the metal surface. The steam helps loosen and lift grease more effectively than mechanical scrubbing alone. This approach requires caution. Ensure the grill is turned off and has cooled sufficiently to prevent burns, and always test the arrangement on a small area first to confirm that the heat does not warp or damage the brush head.
The practicality of heat-assisted cleaning sits at the intersection of efficacy and preservation. When executed with care, this method can reduce the amount of aggressive scrubbing needed and extend the life of the brush head. However, the emphasis remains on safety and restraint: avoid applying excessive force that could bend bristles, and do not use abrasive materials that could degrade the bristles or the head’s textured surface. A key preventive practice is to inspect the brush head after drying. Look for bent or missing bristles, frayed fibers, or any loosening near the base. If you observe any such signs, retire the brush or set it aside for targeted replacement. The goal is to maintain a tool that cleans effectively and remains reliable when you need it most.
To situate these practices within the broader landscape of equipment maintenance, consider how professional standards emphasize consistent care for firefighting tools. The guidance from safety agencies and equipment manufacturers underscores the importance of routine maintenance, proper cleaning, and careful storage. Cleanliness is not simply about aesthetics; it is about safety, reliability, and the ability to perform under pressure. When a brush is clean and dry, you can trust it to perform on the next shift or call, limiting risks to responders and those they protect. The discipline of maintenance becomes part of a larger culture that prizes readiness and accountability. In that light, the simple act of soaking, scrubbing, rinsing, and drying becomes a deliberate ritual that reinforces the habit of care, a habit that translates into operational effectiveness when seconds count.
As you integrate these steps into your routine, you may also find value in relating your practice to a broader ecosystem of fire-rescue maintenance resources. For readers seeking a more expansive understanding of equipment care and facility sustainability, a resource focusing on the green, health-conscious approach to fire service spaces offers a broader perspective. This reference discusses how institutions focus on long-term maintenance and safe environments for both responders and communities. It serves as a reminder that the care of one tool mirrors the care of the systems that keep people safe in times of crisis. For a concise primer on related ideas, see the discussion at the green firehouse concept, which emphasizes sustainable practices in community-facing fire facilities. the green firehouse: creating sustainable spaces for community and health.
In practical terms, the cleaning cycle you adopt for a standard grill brush translates well to the handling of more specialized cleaning heads used in fire-rescue contexts. The core principles—remove loose debris, soak to loosen, scrub with purpose, rinse thoroughly, dry completely, sanitize if needed, and store in a dry space—remain constant. The details may shift depending on the device, but the rhythm of care does not. A well-maintained brush head stands up to repeated use, resists corrosion, and delivers consistent performance when confronted with tough, greasy residues on the grill. The discipline translates into fewer performance gaps, less downtime, and greater confidence when the grill is required for emergency food service or public demonstrations alongside fire-safety education.
If you are curious about the specific cleaning techniques for a particular brush head or cleaning accessory used in professional settings, you can explore more about how such heads are designed to operate under heat and steam. The core idea remains the same: soaking, controlled heating, and careful, gentle scrubbing with attention to the integrity of the bristles. Avoid abrasive tools like steel wool, which can damage bristles and shorten the life of the head. The guidance for modern cleaning heads continues to emphasize safety and efficiency, aligning with NFPA recommendations for equipment maintenance and sanitation. In practice, applying these principles yields a brush that remains reliable in demanding environments and vibrant in its ability to lift grease without sacrificing structural integrity.
For practitioners, a disciplined, repeatable routine is more valuable than ad-hoc, sporadic maintenance. The rhythm of cleaning—debris removal, soaking, scrubbing, rinsing, drying, sanitizing, and storing—establishes a dependable baseline. It becomes part of the daily rhythm of crew readiness, a small but essential component of a larger culture that protects responders and the public alike. The attention to detail in this ritual reinforces a broader message: care is a form of safety. The brush, though small, plays a part in the chain of preparedness that supports optimal performance in real-world situations. By following these steps and embracing the recommended cautions—particularly around moisture exposure to non-metal components—you contribute to a safer, more effective firefighting ecosystem.
External resources can offer deeper insight into the philosophy of maintenance and the specific technical nuances of modern brush heads. For those who want to consult a detailed product-focused resource that describes cleaning processes for a particular head designed for repetitive use on grills, the following link provides additional context and concrete instructions. External resource: https://www.amazon.com/Grill-Rescue-BBQ-Replacement-Cleaning/dp/B08X5KJ6YV
From Clean to Safe: Mastering Drying and Storage for the Fire-Rescue Grill Brush

After a shift, the grill brush carries heat, grease, and stubborn residue. Cleaning becomes more than maintenance; it protects performance and reduces contamination risk. In firefighting operations, every tool must be reliable and ready at a moment’s notice. A clean brush prevents debris from transferring onto grates, surfaces, or hands. It also cuts the chance of bristle detachment during use. Proper care starts with understanding how the brush is built and how it works. Many brushes use a bristle-free head for easier cleaning and robustness. The head design helps water reach joints and the base where grime hides. Still, the handle requires special attention to avoid damage during soaking. The approach to cleaning should feel like a routine rather than a chore. A steady rhythm reduces the chance of skipping critical steps. Consistency matters as much as the steps themselves. A well-cared brush stays sharper, lasts longer, and performs reliably in theaters of work. Safety hinges on hygiene and structural integrity of the tool. When the head is clean, you reduce the risk of cross-contamination. When joints are dry, the risk of rust declines. Maintaining the brush is part of broader equipment hygiene in fire-rescue settings. It also models best practice for crew members who scrub kitchens and grills. Detailing the cleaning path ensures every part gets attention eventually. The process must balance thoroughness with the urgency of shifting duties. Short, deliberate steps beat rushed, incomplete cleaning every time. This chapter frames that balance as a continuous practice. It ties to the larger goal of readiness across shifts and tasks. The end result is a brush that cleans more effectively and lasts longer.
Begin the after-use phase while the grill remains warm with burners off. Heat loosens grease, making debris easier to lift from the head. Start with a firm scrape to dislodge chunky remnants. Use a solid, stable surface as a target for debris removal. A metal tray or grate edge provides a rough but safe surface. Scraping should push waste away from moving parts. Avoid squeezing too hard, which can bend joints or loosen the head. The goal is to remove obvious waste without damaging the structure. As debris loosens, switch to lighter cleaning to prevent smearing. Running your hand along the head helps detect stubborn spots. Any stubborn residue requires a second pass with brief pressure. The first pass sets the stage for deeper cleaning later. It also prevents grease from hardening before you start soaking. A quick pre-clean shortens the soak time and boosts effectiveness. If flames or heat risk remain nearby, reposition the brush safely. Keep cords, hoses, and other tools clear of interference zones. After scraping, wipe the handle with a dry cloth if needed. The primary aim is to curb surface build-up before soaking. Quick, decisive action in this phase saves time later. The method should feel deliberate, not frantic or improvisational. Small controlled movements yield cleaner results and less mess. A calm approach reduces the chance of accidents near hot surfaces. When complete, move to the soaking stage with confidence. The transition should feel natural, not disruptive to the workflow.
For a deeper clean, submerge the brush head in hot water. If the handle is durable enough, you may soak the entire brush briefly. Dish soap helps cut grease that clings to the bristles. A mild baking soda dash offers a gentle abrasive boost. Let the head soak for 15 to 30 minutes, depending on grime. The water should be hot but not scalding to protect materials. The bristle-free design ensures water can reach the base parts. Submerged soaking loosens grease trapped where the head meets the frame. If the handle is metal, avoid aggressive submersion that invites rust. A soft cloth can remove surface film after soaking. For tougher areas, wrap a cloth around the base and wipe. A stiff brush can access the base without marring metal. Gently scrub the bristles and the base in slow, steady motions. Baking soda acts as a mild abrasive in difficult spots. Rinse the head and the base under clean water to remove suds. Inspect for any remaining grime before drying. If necessary, repeat the soak with fresh hot water. The soak loosens what brushing cannot reach on the first pass. Avoid soaking any wooden parts for extended periods. Ensure the water contacts all sides of the head for even cleaning. The goal is a clean, grease-free surface before drying begins. Facing the underside of the head often reveals hidden residues. Once clean, prepare for thorough rinsing and drying. The deep clean sets the tone for safety during use.
Rinse the brush under running water until all soap and residue vanish. A gentle spray prevents splashing and keeps nearby surfaces clean. Check every crevice around the base and joints for leftover soap. Shake off excess water to speed up drying. Place the brush in a position where air can circulate freely. Lay it flat or hang it from a rack for even drying. Avoid leaving it in a damp box or toolbox. Moisture can promote mold growth or rust on metal parts. In humid environments, extra air movement helps drying. If needed, use a small towel to wick away moisture from the handle. Be mindful of any damp fabric touching the metal portions. Check the handle joint for looseness or corrosion after washing. Proper drying reduces the risk of future rust or mildew formation. Do not force dry by applying heat; air drying is safer. In a workshop, a fan can improve airflow around the brush. Rotate the brush occasionally to aid even drying of all sides. In time, the brush becomes dry to the touch across all surfaces. The goal is a uniformly dry tool ready for storage. A dry brush resists odors better and stays cleaner longer. Moisture trapped in joints is a common source of trouble. If any moisture remains, set the brush aside to finish drying. Do not store until completely dry to prevent compromised performance. The habit of proper drying helps extend tool life. When completely dry, proceed to storage with confidence.
Sanitation is optional but supports hygiene across cooking surfaces. A vinegar solution can help kill lingering bacteria and odors. Mix one part white vinegar with three parts water for soaking. Submerge the head briefly if the handle allows, avoiding damage. Soak for ten to fifteen minutes to let the acid do its work. Rinse again to remove vinegar and loosened grime. The vinegar also helps neutralize stale smells from previous uses. If the brush has sensitive materials, shorten exposure time. After rinse, dry thoroughly using the method described above. Vinegar is generally safe for metal before full drying. Do not soak wooden handles in vinegar for long periods. If the handle is wood or fragile, protect it with wrap or bag. Alternatively, wipe with a damp cloth and dry completely. Avoid leaving any vinegar residues on the surface. Sanitation should never replace mechanical cleaning steps. Even after sanitizing, a final rinse helps ensure cleanliness. Always inspect for signs of corrosion or wear after any soak. If damage is evident, retire the tool from service. A sanitized brush offers confidence during food-contact tasks. The key is to maintain hygiene without compromising tool integrity. This extra step can be particularly valuable after heavy usage. When in doubt, rely on manufacturer guidelines for sanitizing features. The practice, though optional, reinforces a culture of cleanliness. It closes the loop between cleaning, drying, and responsible use.
The storage phase completes the care cycle and protects the investment. Always store the brush in a dry, ventilated area. A dry environment prevents mold and rust growth over time. A hook or wall rack keeps the head off the ground. Elevating the head reduces potential damage during transport. Good airflow around the head speeds drying between uses. Do not conceal the brush in dark corners or closed boxes. A protective cover, if available, shields from dust and scratches. If you have space, place the brush in a dedicated tool zone. Labeling the location helps teams locate gear quickly. Avoid storing near electricity or heat sources that could warp materials. Check the area regularly for moisture buildup in shelves. Regular checks ensure early detection of mold or rust. Replace damaged brushes promptly to avoid malfunctions. Even with a bristle-free head, joints may wear with time. A routine inspection complements cleaning and drying cycles. Keep the brush away from corrosive cleaners that could degrade surfaces. Do not store a wet brush in a toolbox or locker overnight. The storage choice should reflect the climate and workload. In warm, humid climates, prioritize faster drying and breathable storage. When possible, let air circulate around the head for hours between uses. A well-chosen hanger or rack reduces clutter on the work floor. The result is a better-organized toolkit that supports readiness. In summary, proper storage completes the maintenance loop and supports safety. Further guidance is available in the NFPA cleaning and maintenance guidelines: NFPA guidelines
Final thoughts
In summary, understanding how to clean and maintain fire rescue grill brushes is vital for those in firefighting and rescue roles, as well as for community members who prioritize safety in their environments. By systematically removing loose debris, employing effective soaking and scrubbing techniques, and ensuring proper drying and storage, users can significantly extend the life and efficacy of their brushes. Regular maintenance not only promotes hygiene but also reflects a commitment to operational readiness and public safety. As such, incorporating these practices into your routine is a proactive step toward ensuring both equipment reliability and safety.